I’ve been pretty upset at the fact that audio gets neglected in a lot of projects, especially in ones that are made during college and production courses. There’s never time to have major attention to detail with audio, even though it is a major part of polishing a game and giving it that “oomph” that it needs. As an audiophile this really makes me uneasy, and this is what prompted me to do a project completely dedicated to improving audio experience. Although a light one at best, I worked around designing audio occlusion so that audio gets muffled or quieter depending on certain criteria met with the environment. The implementation was done with Unity3D, mainly its implementation of the FMod API.
Unity has a pretty intuitive implementation of FMod, which is comprised of the following components:
- AudioListener: What is hearing the audio
- AudioSource: What is producing the audio
- AudioClip: The actual audio.
These are all components that can be added to your GameObjects (entities) seamlessly and creating sound feedback in no time. I won’t go into detail on the specifics of these components, because they aren’t the meat of what this project is, but feel free to access the Unity documentation for more information on these.

The main components that make up my portion of this simulation are as followed:
- Audio Manager
- Audio Emitters
- Emitter Boundaries
The Audio Manager is what handles loading all the resources, and designating Audio Clips to all of the Emitters in the scene. There would typically be more meat in a larger project for this (Unloading assets, playing one shot audio, pitch bending clips, etc.), but for this project that’s all I delegated to the manager. The Emitters are the meaty goodness of my project.
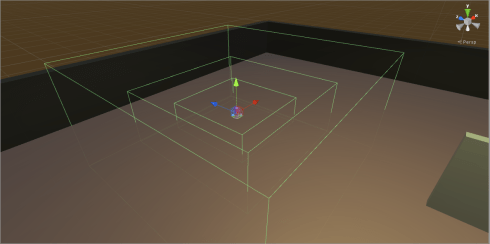
The emitter is that pink cylinder that’s highlighted in the middle. The emitter plays the assigned AudioClip it is given from the manager on loop. The box colliders that you see on screen are the boundary markers for volume levels to the player, which contains the AudioListener. The center collider has the emitter playing the clip at full volume, and the further out the player gets, the more the volume gets reduced until you leave the third boundary. Once out of the third boundary, the player cannot hear the emitter anymore. Pretty simple stuff involving trigger detection and lerping float values (if you think lerping is simple). When we introduce more variables, that’s when we get more complex.

Of course I had to simulate what it’s like to hear muffled sound behind walls as well. Each wall type muffles the emitter by a different value (my apartment walls are the thin ones so it was easy to know if that was accurate). The boundaries still play into this as well, and I had it test the wall distances so that you can hear the difference for all wall types and all boundary distances. This also includes muffling through floors as well!
In order to get the exact volume wanted, I had to keep track of the current boundary the player was in, as well as linecast between the player and emitter to see if anything was between them. If the cast hit a wall, I would pull the type from the wall, and muffle the volume based on the wall type and current boundary. Examples of the code are right here:

Once the correct volume was determined, the code lerps the original volume to the correct volume for a smooth transition, then stop lerping when the volume was within a certain margin of error. With a few more in-depth tweaks, this could get way more advanced and more realistic. I’d like to implement this into a bigger project and see how much resources it takes up to determine if this is an optimized and intuitive method of doing this.
The take-aways from this project is essentially there are easy methods that don’t take too much time to implement to get some realistic sound going on in 3D games, and people should stop neglecting audio! If I had more time for this project, I would either go more into depth with further sound properties (echo, room types, etc.) or even use the unhindered FMod API to make something without Unity. This won’t be the stop of my exploration into game audio, so look forward to seeing more of that.
